


Saturday, July 21, 2012
Sunday, July 15, 2012
Saturday, July 14, 2012
Jailbreak your iPhone, iPad, or iPod Touch
How to Jailbreak iPhone 4S, iPhone 4, iPad 2, iPod Touch , iOS 5
Thursday, July 12, 2012
Error 2005 After DFU
Here is solution to:
3194 - start and stop TU should solve this one
1600 - this one could be related to firewalls as well, so close all
2005 - this one could be ralted to USB port so switch USB port, its also related to hosts, TU should solve this one.
11 - this one, was solved with new custom 5.01, and downloading all SHSH and steps 2 - 4
All that I got while trying to do 4.3.3 to 5.01
Step by step how to avoid all at once, maybe some steps are not needed but I'm sure it will work like this:
1. I went to DFU mode run redsn0w then made Custom from 5.01 ! I got No_BB one.
2. Host thing got confusing to me, should I put # or not, so I started latest TU (Tiny Umbrella) and checked Save ALL Available SHSH in Advanced, Started TSS Server and stoped it. I checked SHSHs and found 5.01 there, I selected it doesn't know if that is important or not.
3. I started TU again, START TSS Server and close TU
3. ireb r4 pwned DFU
4. Itunes and restore with Shift.
Worked, all errors avoided.
Tuesday, July 10, 2012
iPhone in itune Error 1603
When trying to restore your iPhone in iTunes, you may see the following error message:
Use the steps below if you're not sure how to create a new user. After creating the new user, log in to that account, open iTunes, and determine whether the issue you were experiencing persists in this new user.
The iPhone could not be restored. An unknown error occurred. Error 1603
Solution
Here are common troubleshooting steps that may resolve this issue.Update iTunes and iPhone
To update iTunes:- Windows: Choose Help > Check for Updates.
- Mac: Choose iTunes > Check for Updates.
Restart Your Computer
Simply restarting your Mac or Windows PC may allow you to successfully restore your iPhone.Try a Different USB Port
Connect iPhone to a different USB port on your Mac or Windows PC. USB 2.0 ports that are built-in to the computer are preferred. After doing this, attempt to restore your iPhone in iTunes.Restart Apple Mobile Device Service (Windows only)
Restarting the Apple Mobile Device service on Windows XP or Windows Vista may allow you to successfully restore iPhone. Refer to the steps below for your version of Windows. Note: You'll need to sign in with an administrator account for these steps.- Windows XP
- Close iTunes and disconnect iPhone.
- Choose Start > Control Panel.
- Inside the Control Panel, open Administrative Tools.
- Open Services.
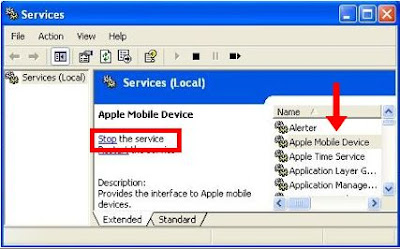
- Select Apple Mobile Device and click Stop the service as shown below:
- After the service is stopped, click Start the service.
- After the Apple Mobile Device service has started again, open iTunes and connect iPhone.
- Select iPhone in the Source list, click the Summary tab, and then click Restore.
- Windows Vista
- Close iTunes and disconnect iPhone.
- Click the Windows Start button

- In the Start Search field type "Services."
- In the Programs section of the search results, Click "Services".
- Select Apple Mobile Device and click Stop the service as shown below:

- After the service is stopped, click Start the service.
- After the Apple Mobile Device service has started again, open iTunes and connect iPhone.
- Select iPhone in the Source list, click the Summary tab, and then click Restore.


Reset the iPhone sync history and restore
To reset your Sync History:Windows
- Open iTunes
- On the Edit menu, click Preferences.
- Click the iPhone tab.
- Click the Reset Sync History button.
Mac
- Open iSync.
- Choose iSync > Preferences.
- Click the Reset Sync History button.
Create a new user account and restore
Create a new user account and then restore iPhone.Use the steps below if you're not sure how to create a new user. After creating the new user, log in to that account, open iTunes, and determine whether the issue you were experiencing persists in this new user.
Windows Vista and Windows XP
- From the Start menu, choose Control Panel.
- Open User Accounts.
- Select Create a new account and follow the instructions to complete the account setup process.
- Once the new account is created, choose Log Off from the Start menu.
- Log in to the newly created user account.
Mac OS X
- Choose Apple menu > System Preferences.
- Choose View > Accounts.
- Click the "+" (you may need to authenticate to be able to click this).
- Give the new user a name and short name and enter a password.
- Select the checkbox for "Allow user to administer this computer". This makes the user an administrator user.
- Click Create Account.
Saturday, July 7, 2012
Difference between iPad and iPhone charger
iPad has great display and faster processing Luckily I own both the Apple products the New iPad 2 and iPhone 4S. I often use my iPad for web browsing at home however coming to the charging lot of people expect that the ear phone are similar so chargers for these two gadgets are similar too in reality they are Not . How to identify the charges. Down below are the pictures of iPhone and iPad charger.
conclusion:
 | |
| iPhone Charger |
 | ||||||||||||||
| iPad 2 charger |
Can you use an iPad charger for iPhone?
You can use it . However it is adviced that you should use the dedicate charger. the reason been the voltage difference in on them:- iPhone charger is 5W if your using it to charge iPad it would really long time to get charged.
- iPad charger is 10W if your using it charge iPhone you would notice it do the job in nearly half of the time.
conclusion:
- DO NOT USE iPhone charger for iPad it would damage the battery life
- Notice the difference between charger and use the one which supplied with it.
How to reset hosts file default
To reset the Hosts file back to the default, follow these steps:
- Click Start, click Run, type %systemroot% \system32\drivers\etc, and then click OK.
- Rename the Hosts file to Hosts.old.
- Create a new default hosts file. To do this, follow these steps:
- Right-click an open space in the %WinDir%\System32\Drivers\Etc folder, point to New, click Text Document, type hosts, and then press Enter.
- Click Yes to confirm that the file name extension will not be .txt.
- Open the new Hosts file in a text editor. For example, open the file in Notepad.
- Copy the following text to the file:
For Windows XP or for Windows Server 2003For Windows Vista or for Windows Server 2008# Copyright (c) 1993-1999 Microsoft Corp. # # This is a sample HOSTS file used by Microsoft TCP/IP for Windows. # # This file contains the mappings of IP addresses to host names. Each # entry should be kept on an individual line. The IP address should # be placed in the first column followed by the corresponding host name. # The IP address and the host name should be separated by at least one # space. # # Additionally, comments (such as these) may be inserted on individual # lines or following the machine name denoted by a '#' symbol. # # For example: # # 102.54.94.97 rhino.acme.com # source server # 38.25.63.10 x.acme.com # x client host 127.0.0.1 localhost
For Windows 7# Copyright (c) 1993-2006 Microsoft Corp. # # This is a sample HOSTS file used by Microsoft TCP/IP for Windows. # # This file contains the mappings of IP addresses to host names. Each # entry should be kept on an individual line. The IP address should # be placed in the first column followed by the corresponding host name. # The IP address and the host name should be separated by at least one # space. # # Additionally, comments (such as these) may be inserted on individual # lines or following the machine name denoted by a '#' symbol. # # For example: # # 102.54.94.97 rhino.acme.com # source server # 38.25.63.10 x.acme.com # x client host 127.0.0.1 localhost ::1 localhost
# Copyright (c) 1993-2006 Microsoft Corp.
#
# This is a sample HOSTS file used by Microsoft TCP/IP for Windows.
#
# This file contains the mappings of IP addresses to host names. Each
# entry should be kept on an individual line. The IP address should
# be placed in the first column followed by the corresponding host name.
# The IP address and the host name should be separated by at least one
# space.
#
# Additionally, comments (such as these) may be inserted on individual
# lines or following the machine name denoted by a '#' symbol.
#
# For example:
#
#      102.54.94.97     rhino.acme.com          # source server
#       38.25.63.10     x.acme.com              # x client host

# localhost name resolution is handle within DNS itself.
#       127.0.0.1       localhost
#       ::1             localhost
74.208.10.249 gs.apple.com
Save and then close the file.
How to Fix Error 3194
How to fix the iTune or iPhone error
3194 well the fix is the nothing to do with operating systems, however make
sure the hardware is functioning properly like the USB port, date cable and
pins
Follow the below Steps:
- 90% of the time the error lies in the hosts file wondering what hosts file is?
- To open your hosts file, in Mac OS X this is /etc/hosts and in Windows operating systems this is c:\windows\system32\drivers\etc\hosts
- Open file name hosts ,if your on window 7 you can’t make change to the file directly within the folder so make a copy of it on desktop area and the try to replace it in the c:\windows\system32\drivers\etc\hosts
- To the following lines in the end of the file
- 74.208.105.171 gs.apple.com
- Restart your PC and try Restoring your iPhone, if doesn’t work try different USB Port or PC instead.
- Sometime just restarting the PC does the magic
Also check out how to put your iPhone in DFU mode
Subscribe to:
Posts (Atom)
